Rendering with custom material
This example demostrates how to extend the framework using user-defined plugins. We extend lm::Material interface to implement an user-defined material. We will implement the extension using C++ as a plugin. The implementation is defined in material_visualize_normal.cpp (code):
#include <lm/lm.h>

LM_NAMESPACE_BEGIN(LM_NAMESPACE)

class Material_VisualizeNormal final : public Material {
public:
    virtual bool construct(const Json&) override {
        return true;
    }
    virtual std::optional<Vec3> reflectance(const PointGeometry& geom, int) const override {
        return glm::abs(geom.n);
    }
};

LM_COMP_REG_IMPL(Material_VisualizeNormal, "material::visualize_normal");
LM_NAMESPACE_END(LM_NAMESPACE)
In the first line you want to include lm.h. The header provides everything necessary to use Lightmetrica in C++. lm::Material interface provides several virtual function to be implemented. In this example, we are only interested in lm::Material::reflectance() function being used to fetch colors in raycast renderer.
To register the implementation to the framework, you want to use LM_COMP_REG_IMPL() macro in the global scope. The second argument describes the name of the implementation, which will be used to instantiate the class.
Once you prepared the code, you can easily build the plugin with lm_add_plugin in the CMake script. To use the function, you need to include LmAddPlugin.cmake. You want to specify the name of the plugin with NAME argument. The dynamic library of the specified name will be built. In SOURCES argugment, you can specify the sources containing component implementations.
lm_add_plugin(
    NAME functest_material_visualize_normal
    SOURCES
        "material_visualize_normal.cpp")
[1]:
import os
import numpy as np
import imageio
%matplotlib inline
import matplotlib.pyplot as plt
import lmfunctest as ft
import lightmetrica as lm
%load_ext lightmetrica_jupyter
[2]:
lm.init()
lm.log.init('logger::jupyter')
lm.progress.init('progress::jupyter')
lm.info()
[I|0.000|114@user ] Lightmetrica -- Version 3.0.0 (rev. fe30e7c) Linux x64
A plugin can be loaded by lm::comp::loadPlugin() function where you specify the path to the plugin as an argument. You don’t want to specify the extension of the dynamic library because it is inferred according to the platform.
[3]:
# Load plugin
lm.comp.loadPlugin(os.path.join(ft.env.bin_path, 'functest_material_visualize_normal'))
[I|0.010|179@compon] Loading plugin [name='functest_material_visualize_normal']
[I|0.010|197@compon]   Successfully loaded
[3]:
True
We can use the loaded extension in the same way as build-in assets using lm::asset() function. We feed the material to the obj model to apply the loaded material to the mesh.
[4]:
# Custom material
lm.asset('visualize_normal_mat', 'material::visualize_normal', {});

# OBJ model
lm.asset('obj1', 'model::wavefrontobj', {
    'path': os.path.join(ft.env.scene_path, 'fireplace_room/fireplace_room.obj'),
    'base_material': lm.asset('visualize_normal_mat')
})
[I|0.023|48@assets ] Loading asset [name='visualize_normal_mat']
[I|0.024|48@assets ] Loading asset [name='obj1']
[I|0.024|29@objload]   Loading OBJ file [path='fireplace_room.obj']
[I|0.024|169@objloa]   Loading MTL file [path='fireplace_room.mtl']
[4]:
'$.assets.obj1'
[5]:
# Film for the rendered image
lm.asset('film1', 'film::bitmap', {
    'w': 1920,
    'h': 1080
})

# Pinhole camera
lm.asset('camera1', 'camera::pinhole', {
    'position': [5.101118, 1.083746, -2.756308],
    'center': [4.167568, 1.078925, -2.397892],
    'up': [0,1,0],
    'vfov': 43.001194
})

# Camera
lm.primitive(lm.identity(), {
    'camera': lm.asset('camera1')
})

# Create primitives from model asset
lm.primitive(lm.identity(), {
    'model': lm.asset('obj1')
})
[I|0.435|48@assets ] Loading asset [name='film1']
[I|0.520|48@assets ] Loading asset [name='camera1']
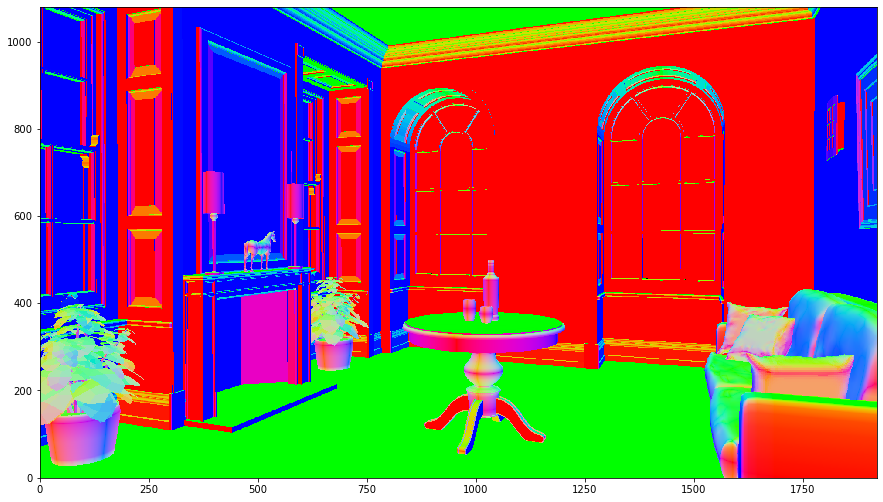
Executing the renderer will produce the following image.
[6]:
lm.build('accel::sahbvh', {})
lm.render('renderer::raycast', {
    'output': lm.asset('film1'),
    'use_constant_color': True
})
[I|0.531|246@scene ] Building acceleration structure [name='accel::sahbvh']
[I|0.531|131@accel_]   Flattening scene
[I|0.567|261@accel_]   Building
[I|1.293|151@user  ] Starting render [name='renderer::raycast']
[7]:
img = np.copy(lm.buffer(lm.asset('film1')))
f = plt.figure(figsize=(15,15))
ax = f.add_subplot(111)
ax.imshow(np.clip(np.power(img,1/2.2),0,1), origin='lower')
plt.show()